melody5417

做让自己佩服的人~


  • 首页

  • 归档

  • 标签

iOS开发:获取最近截屏的图片

发表于 2018-03-29 |

前言

产品大大提了个需求「最近截屏图片的快捷提示」,开发初期被 截屏 误导,导致走了歪路。这里记录下开发思路和相关知识点。之前也没有开发过 相册 相关模块,所以借此机会学习下 PhotoKit 并整理了脑图,先立个flag,坐等 PhotoKit 的分享。

预研

这个需求具体是这样:

  1. 当用户进入App主界面时,检测到30s内有截屏操作,进行图片快捷提示(样式可参考微信发送图片的快捷提示).
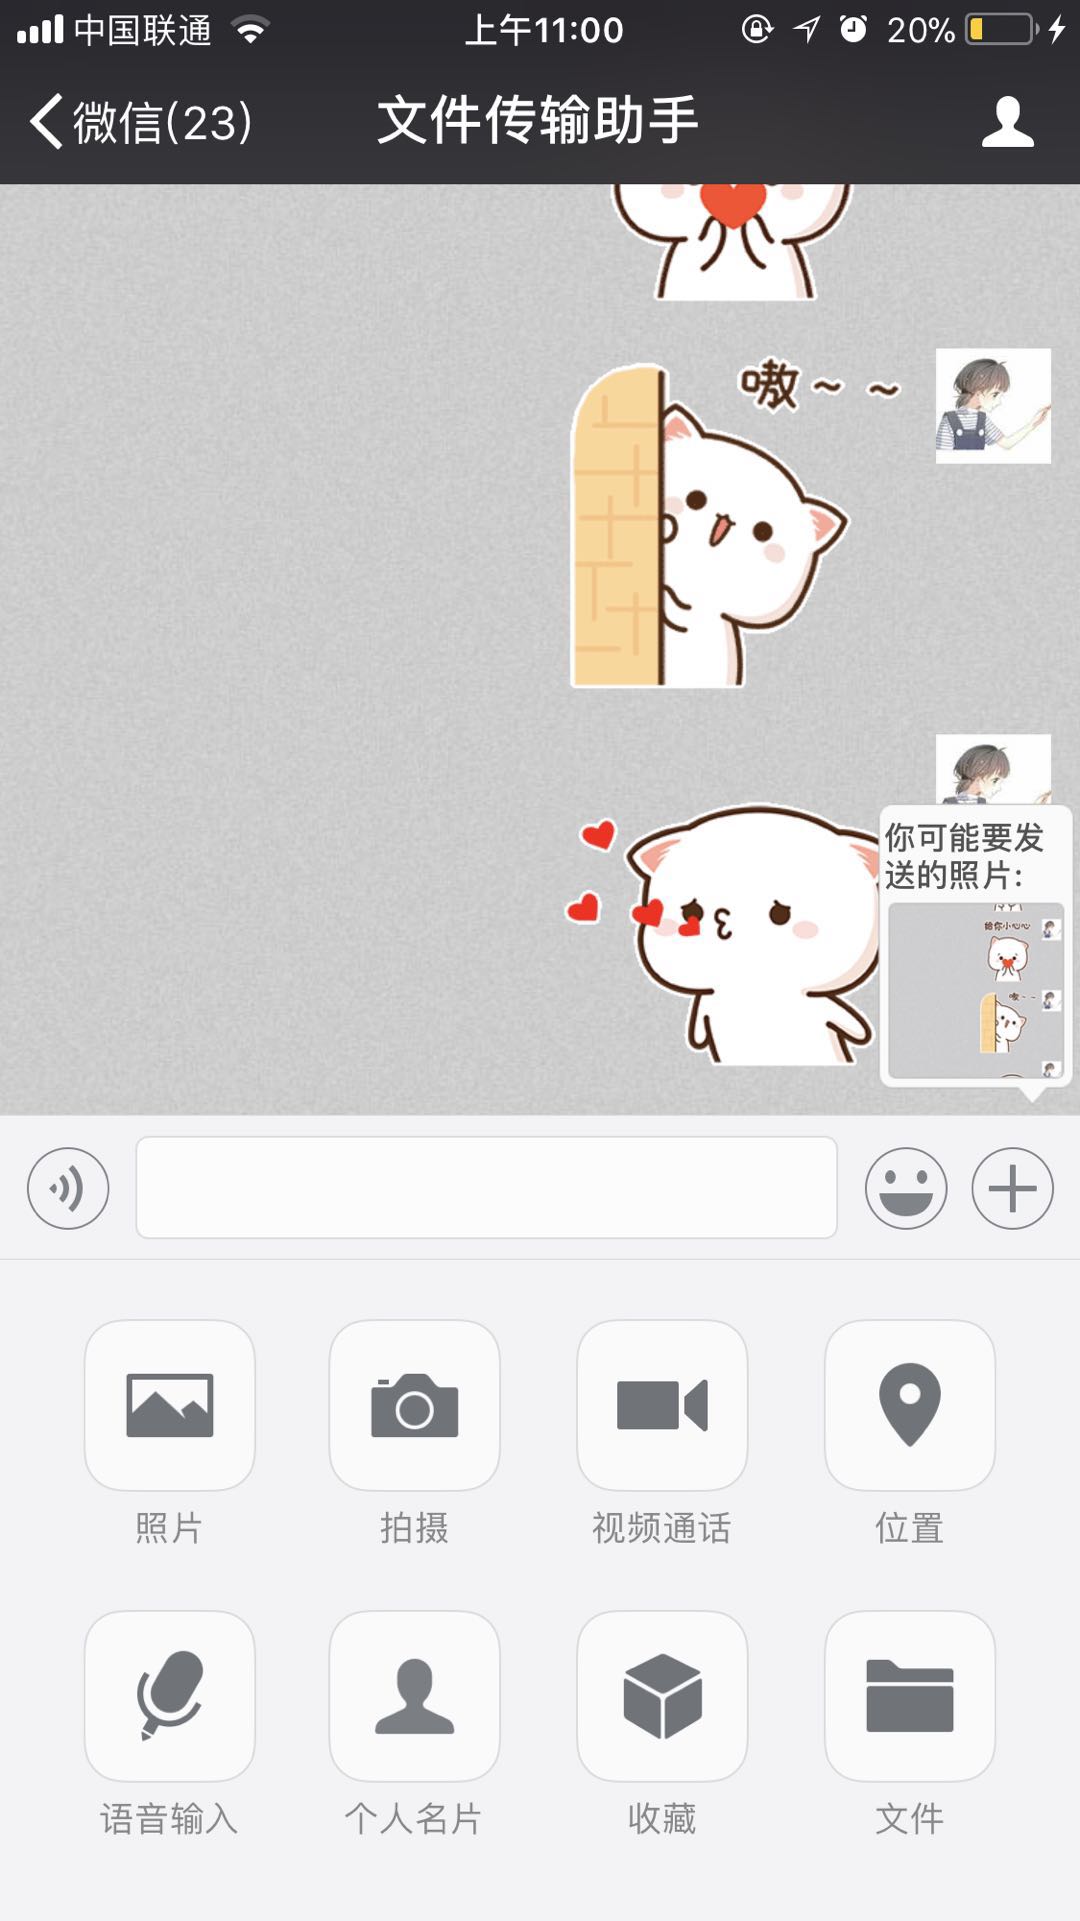


  2. 若用户未点击提示,3s自动消失。

如前言所说,我最开始被截屏这个操作误导,去调研截屏相关的知识。了解到有用户按下 Home 和 Lock 截屏的通知: UIApplicationUserDidTakeScreenshotNotification,以为监听该通知就可以了。但是这个需求的应用场景是:用户在我们的App处于后台的情况下截屏,App处于后台根本无法收到该通知了。所以这个思路肯定不对。

仔细体验了微信的发送图片提示功能后,确定微信的实现原理应该和截屏没有一毛钱关系!应该是当用户点击 按钮时,去检索了截屏相册的图片,获取一定时间内最新添加的截屏图片。明白这个原理就OK了。

代码

  1. 获取相册权限

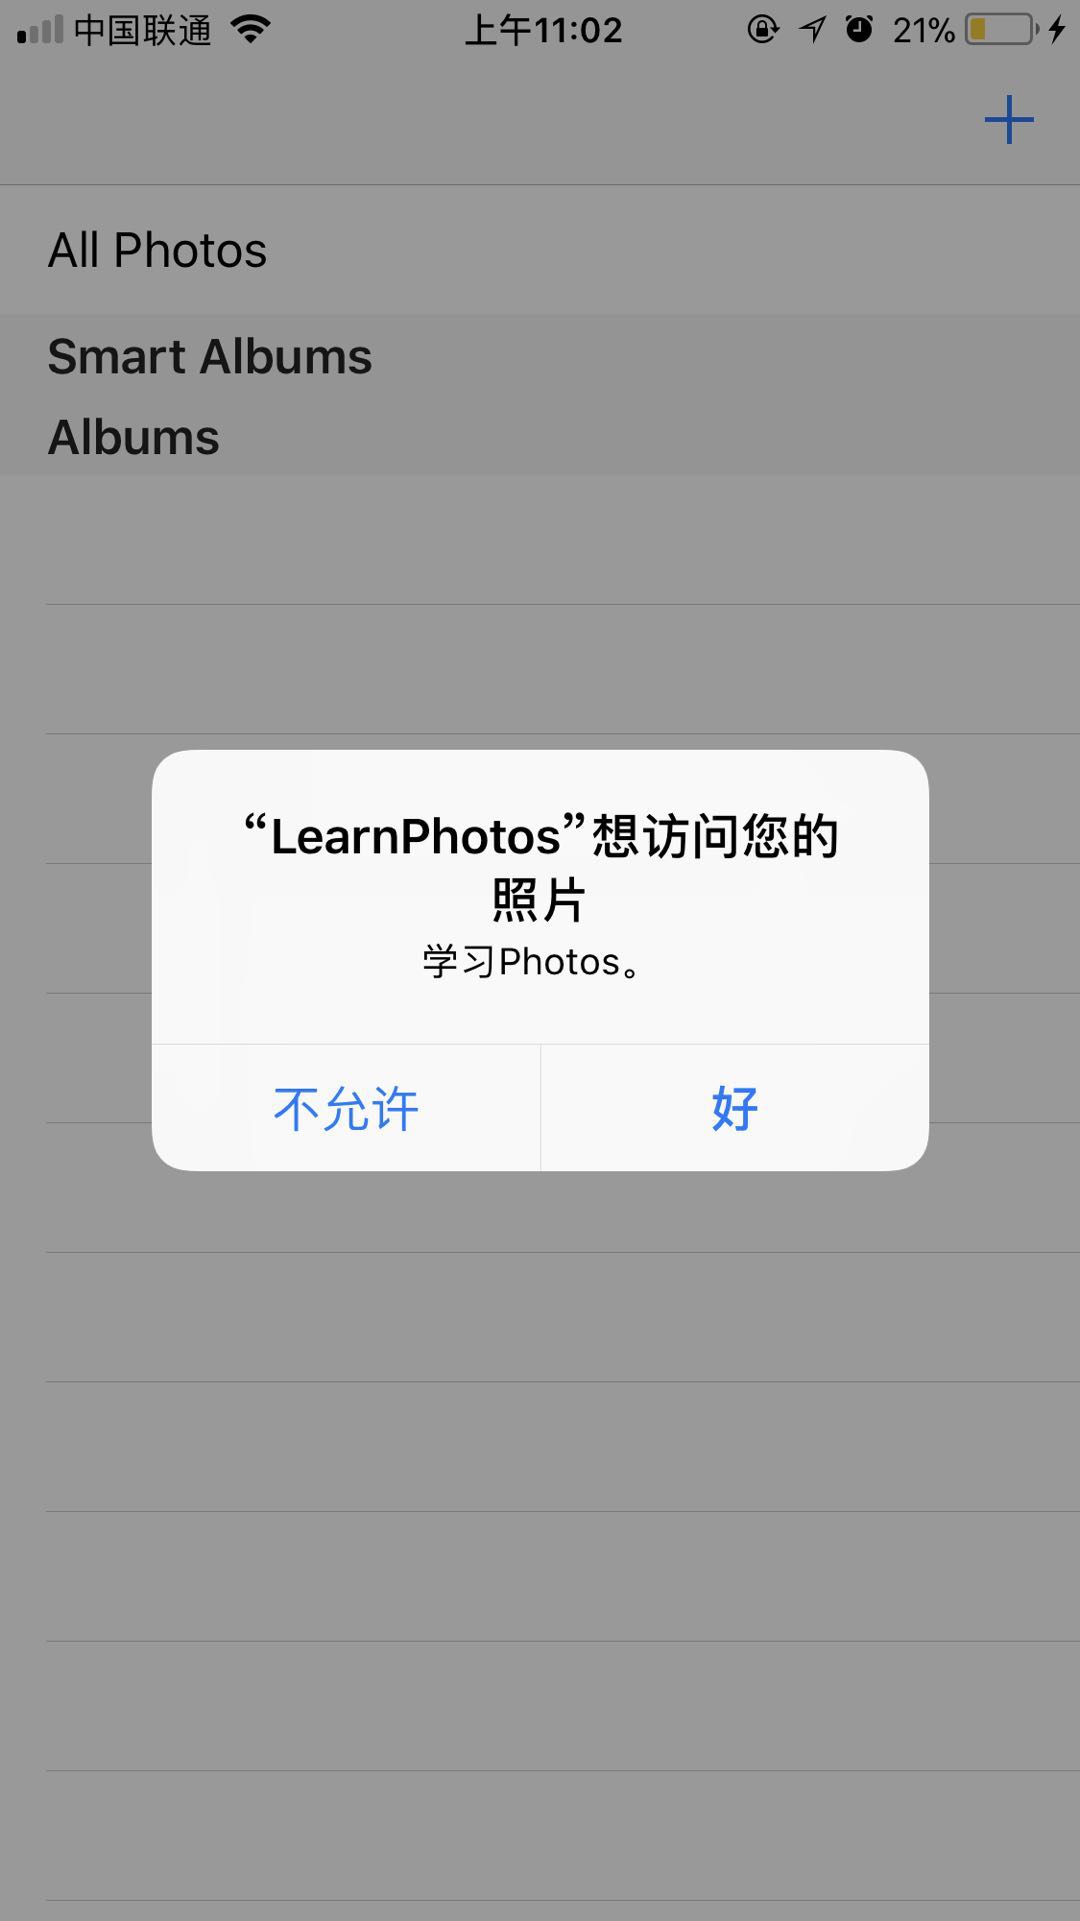
    Info.plist 添加 Key: NSPhotoLibraryUsageDescription。 App启动后首次访问相册等操作 会呼出如下图的 申请权限 弹窗,用户确认后才能获得权限访问相册。


  2. 校验权限

    检测 PHPhotoLibrary.authorizationStatus() 状态:

    • authorized 顺序进行后续操作,

      • notDetermined 可以呼出申请权限的弹窗,
      • denied 用户已拒绝授权,此时可以引导用户到设置页面开启权限,
      • restricted 若返回这个状态,说明第一步没有操作正确,如果还要强制操作必然crash。
      1
      2
      3
      4
      5
      6
      7
      8
      9
      10
      11
      12
      13
      14
      15
      16
      17
      func checkPermission(resultHandler: @escaping (Bool) -> Void) {
      let status = PHPhotoLibrary.authorizationStatus()
      switch status {
      case .notDetermined:
      PHPhotoLibrary.requestAuthorization { (status) in
      if status == .authorized {
      resultHandler(true)
      }
      }
      case .authorized:
      resultHandler(true)
      default:
      resultHandler(false)
      }
      }
  3. 检索截屏相册并获取图片数据

    1
    2
    3
    4
    5
    6
    7
    8
    9
    10
    11
    12
    13
    14
    15
    16
    17
    18
    19
    20
    21
    func getScreenShotRecentlyAdded(resultHandler: @escaping (UIImage?) -> Swift.Void) {
    guard let screenshotCollection = PHAssetCollection.fetchAssetCollections(with: .smartAlbum, subtype: .smartAlbumScreenshots, options: nil).firstObject else {
    return
    }
    let options = PHFetchOptions()
    options.wantsIncrementalChangeDetails = true
    options.predicate = NSPredicate(format: "creationDate > %@", NSDate().addingTimeInterval(-30))
    options.sortDescriptors = [NSSortDescriptor(key: "creationDate", ascending: false)]
    guard let screenshot = PHAsset.fetchAssets(in: screenshotCollection, options: options).firstObject else {
    return
    }
    PHImageManager.default().requestImage(for: screenshot,
    targetSize: PHImageManagerMaximumSize,
    contentMode: .aspectFit,
    options: nil) { (image, infoDic) in
    resultHandler(image)
    }
    }
  4. 优化
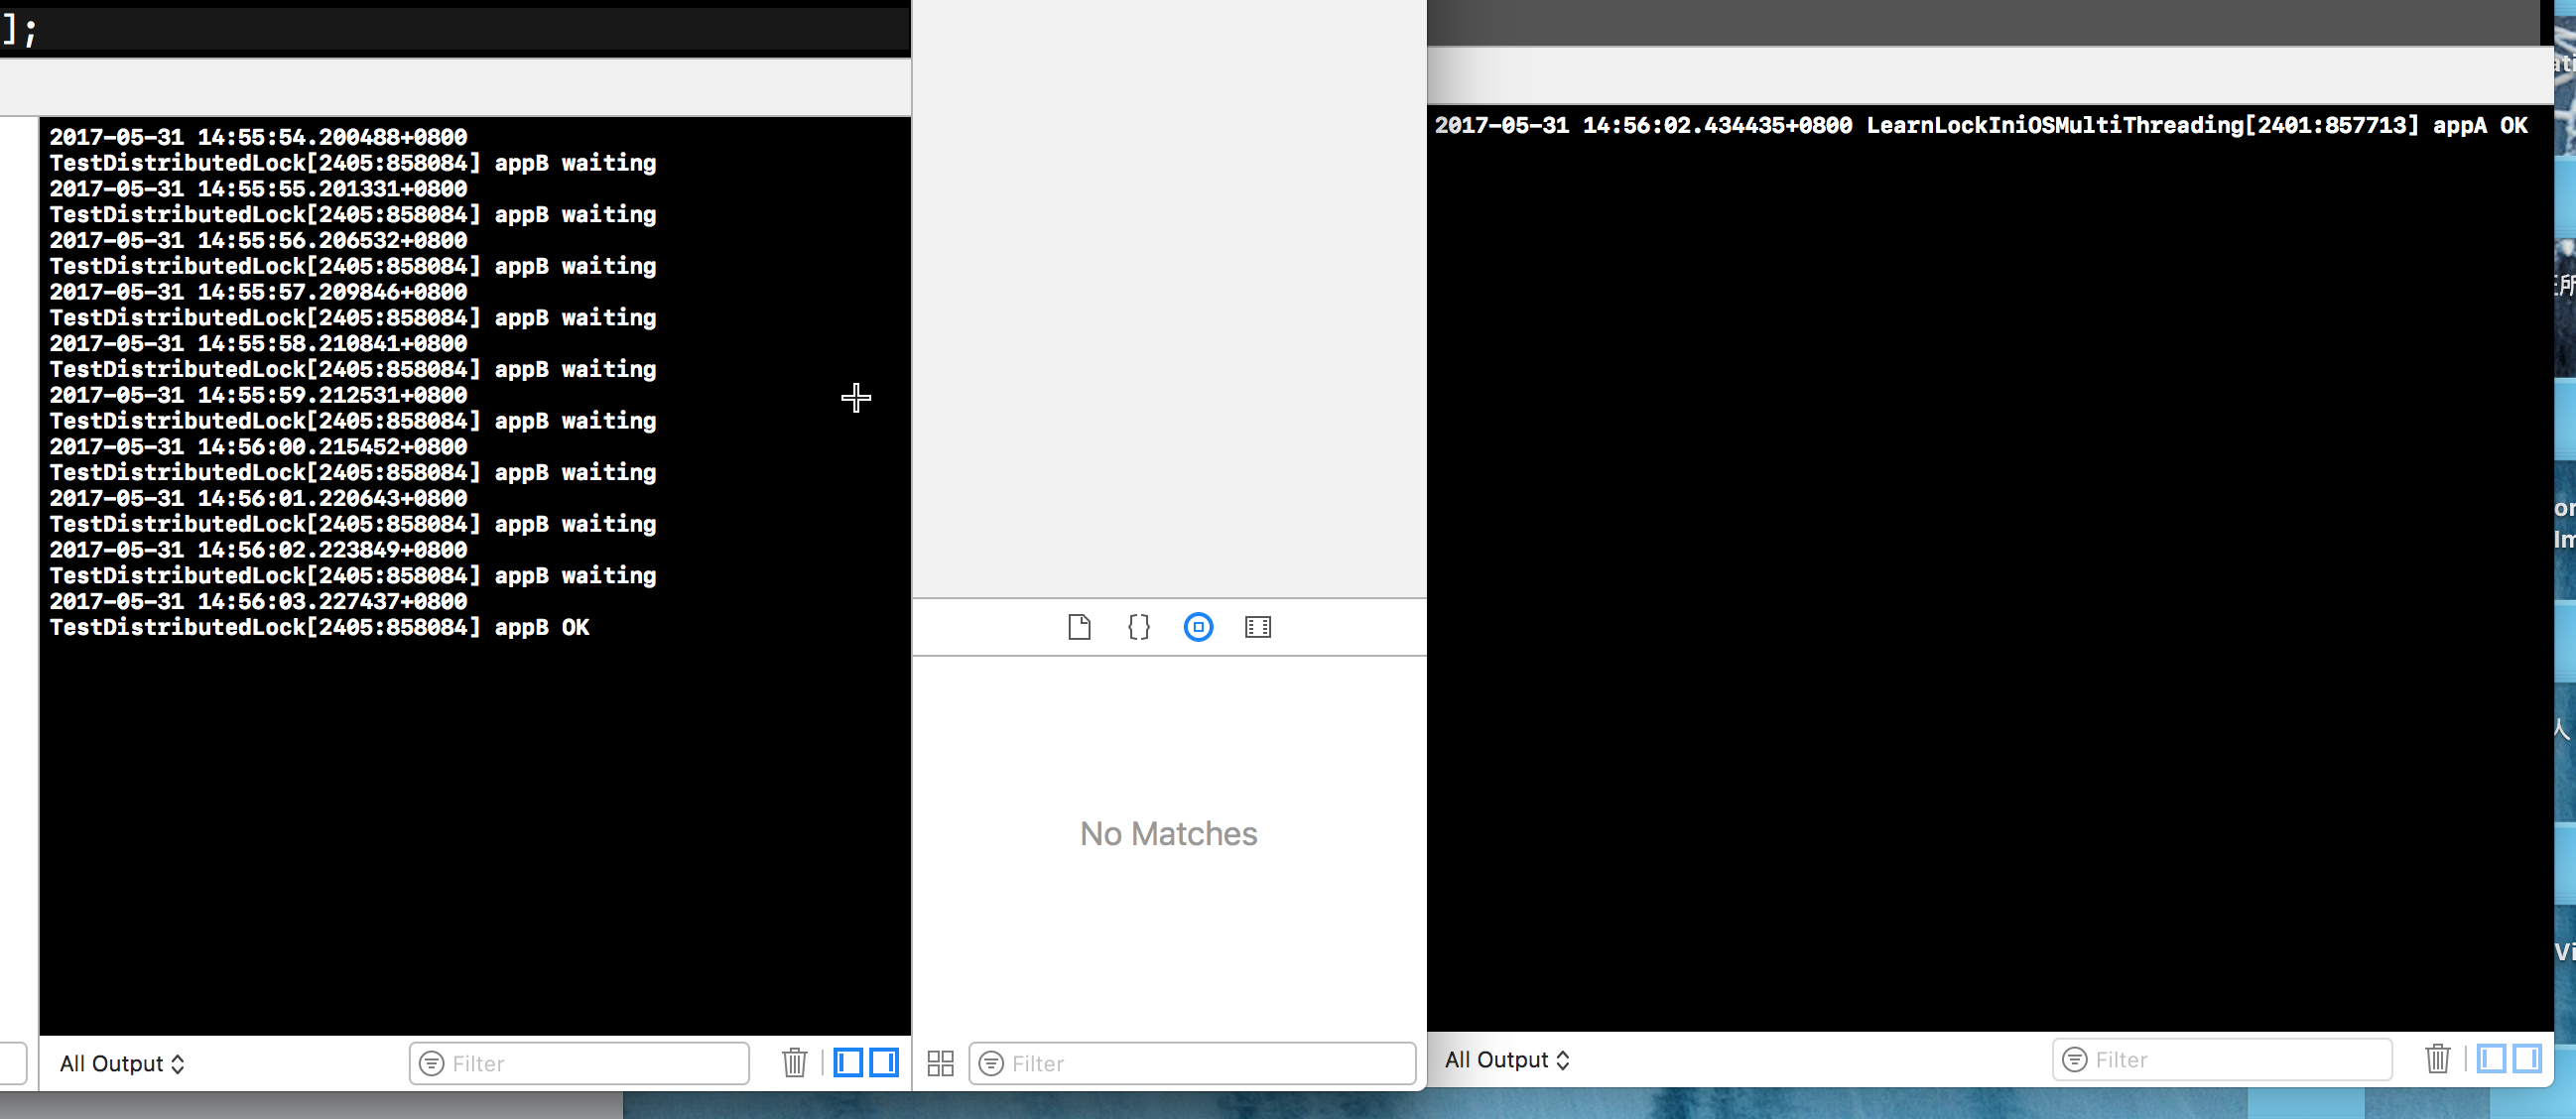
    主流程全部走通提测后,提测提了个bug:截屏30s内多次切换 App 到前后台,同一张截屏图片会提醒多次,这里也确实是自己考虑的不周,加了个 SHA1 去重检测。

Xcode 配置多种 Configuration

发表于 2017-09-05 |

本文示例工程地址

Xcode 默认配置两种标准的 configuration: Debug 和 Release
,可以在 Project -> Info -> Configurations section 页面找到。Rlease 做了编译优化,不能断点调试,但是运行速度较 Debug 包更快,且体积更小。

一般情况下不需要配置额外的 configuration, 但若想 QA 同学同时装线上包和 Debug 包,或者需要区分各种测试/灰度/正式环境,那配置多种 configuration 是非常必要且方便。

配置 Configurations

在 Project -> Info -> Configurations section,直接复用 Debug 创建 DailyBuild。也可以复用 Release 创建 Store 包。
build configurations

配置 Preprocessor macros

在 Target -> BuildingSetting 中搜索 Preprocessor macros, 可以在不同的 configuration 中定义宏,如 DEBUG = 1.
preprocessor macros

在代码中即可获取预定义的宏。

1
2
3
4
5
#if DEBUG
print("debug or dailybuild")
#else
print("release")
#endif

配置 Display name

在 Target -> Info 中添加

1
2
<key>CFBundleDisplayName</key>
<string>$(APP_DISPLAY_NAME)</string>

然后在 Target -> Info 中定义 APP_DISPLAY_NAME,分别指定每个 configuration 对应的名字即可。
Display name

配置 App icon

在 Target -> Build Settings 里搜索 Asset Catalog App Icon Set Name, 配置对应的 asset 名称即可。
AppIconSetting
AppIconAsset

配置环境变量

配置

在 Target -> Info 中定义 Configuration,运行时获取 configuration。
dynamic configuration

然后可以创建 Configuration.swift, 定义如下。

1
2
3
4
5
6
7
8
9
10
11
12
13
14
15
16
17
18
19
20
21
22
23
24
25
26
27
28
29
30
31
32
33
34
35
enum Environment: String {
case DailyBuild = "DailyBuild"
case Debug = "Debug"
case Release = "Release"
var baseURL: String {
switch self {
case .Debug: return "debug:https://v.qq.com"
case .DailyBuild: return "db:https://v.qq.com"
case .Release: return "release:https://v.qq.com"
}
}
var token: String {
switch self {
case .Debug: return "debug:FEWJPFJ23T4NO4390NO"
case .DailyBuild: return "db:FWEJPOUPGE238038R023"
case .Release: return "release:R2UR03U2FIFFJEOUNNGW"
}
}
}
struct Configuration {
lazy var environment: Environment = {
if let configuration = Bundle.main.object(forInfoDictionaryKey: "Configuration") as? String {
switch configuration {
case Environment.DailyBuild.rawValue: return Environment.DailyBuild
case Environment.Debug.rawValue: return Environment.Debug
default: return Environment.Release
}
}
return Environment.Release
}()
}

测试

在 ViewController 的 viewDidLoad 中添加如下代码,更新 scheme 为 dailybuild 或 debug 等,console 会打印对应的 baseURL 和 token。

1
2
3
4
5
// Initialize Configuration
var configuration = Configuration()
print("baseURL: \(configuration.environment.baseURL)")
print("token: \(configuration.environment.token)")

参考

  • https://cocoacasts.com/switching-environments-with-configurations/
  • https://medium.com/@danielgalasko/run-multiple-versions-of-your-app-on-the-same-device-using-xcode-configurations-1fd3a220c608
  • https://medium.com/@danielgalasko/change-your-api-endpoint-environment-using-xcode-configurations-in-swift-c1ad2722200e
  • http://www.jianshu.com/p/51a2bbe877aa

iOS触控事件学习

发表于 2017-08-03 |

刚接触iOS,iOS的基于Touch的触控事件处理和mac的基于鼠标的事件处理还是有些不同。这两天看了官方文档和很多文章,将iOS触控事件处理总结了脑图和demo。(ps:发现自己没有那么多时间和耐性写一篇好长的文章,还是脑图比较适合我,纲领性的知识点总结,方便以后查找,又不需要像写文章那么多时间来整理。)

Demo地址

脑图

ios/OSX crash

发表于 2017-06-13 |

最近在集中处理项目的crash,觉得有必要将解决crash的思路整理总结。
先上脑图:

crash mindnode

先占位,后续补充详细。

Learn Synchronization

发表于 2017-06-01 |

OS X 和 iOS 的多线程安全开发一直都容易成为 App 开发的坑,处理不好就容易出现 crash 或各种各样奇怪的现象,这次下定决心深入研究「多线程开发中的同步工具」。苹果官方资料 本文Demo

Synchronization Tools

同步工具包括:

  • Atomic Operations
  • Memory Barriers and Volatile Variables
  • Locks
  • Conditions
  • Perform Selector Routines

本篇文章主要研究 Locks 和 Conditions。

Tips for Thread-Safe Designs

Avoid Synchronization Altogether

使用锁一定会对性能和响应速度有影响,所以尽量解耦设计,减少交互和依赖的模块,从而减少锁的使用。

Be Aware of Threats to Code Correctness

看下面的🌰:

1
2
3
4
5
6
7
8
9
NSLock* arrayLock = GetArrayLock();
NSMutableArray* myArray = GetSharedArray();
id anObject;
[arrayLock lock];
anObject = [myArray objectAtIndex:0];
[arrayLock unlock];
[anObject doSomething];

array是非线程安全的,所以在修改array的时候加了锁。但是doSomthing方法没有加锁,这里就会出现问题:如果在 unlock 之后,有另外一个线程清空了array,array中的对象被释放,此时anObject指向的是非合法的内存地址,在调用doSomething方法就会出现问题。

为了解决问题,可能会移动doSomething的顺序,将其移入锁内保护。但是,此时又可能出现另一个问题,如果doSomething是一个耗时很长的方法,那就会一直等待,成为性能瓶颈。

解决这个问题的根本在于 “a memory management issue that is triggered only by the presence of other threads. Because it can be released by another thread, a better solution would be to retain anObject before releasing the lock. This solution addresses the real problem of the object being released and does so without introducing a potential performance penalty.”

修正后的代码如下:

1
2
3
4
5
6
7
8
9
10
11
NSLock* arrayLock = GetArrayLock();
NSMutableArray* myArray = GetSharedArray();
id anObject;
[arrayLock lock];
anObject = [myArray objectAtIndex:0];
[anObject retain];
[arrayLock unlock];
[anObject doSomething];
[anObject release];

更多 官方tips

Watch Out for Deadlocks and Livelocks

死锁和活锁的解释

关于“死锁与活锁”的比喻:
死锁:迎面开来的汽车A和汽车B过马路,汽车A得到了半条路的资源(满足死锁发生条件1:资源访问是排他性的,我占了路你就不能上来,除非你爬我头上去),汽车B占了汽车A的另外半条路的资源,A想过去必须请求另一半被B占用的道路(死锁发生条件2:必须整条车身的空间才能开过去,我已经占了一半,尼玛另一半的路被B占用了),B若想过去也必须等待A让路,A是辆兰博基尼,B是开奇瑞QQ的屌丝,A素质比较低开窗对B狂骂:快给老子让开,B很生气,你妈逼的,老子就不让(死锁发生条件3:在未使用完资源前,不能被其他线程剥夺),于是两者相互僵持一个都走不了(死锁发生条件4:环路等待条件),而且导致整条道上的后续车辆也走不了。

活锁:马路中间有条小桥,只能容纳一辆车经过,桥两头开来两辆车A和B,A比较礼貌,示意B先过,B也比较礼貌,示意A先过,结果两人一直谦让谁也过不去。

The best way to avoid both deadlock and livelock situations is to take only one lock at a time. If you must acquire more than one lock at a time, you should make sure that other threads do not try to do something similar.

Using Locks

Using a POSIX Mutex Lock

POSIX mutex lock 有以下几个方法:

1
2
3
4
5
6
7
pthread_mutex_t mutex = PTHREAD_MUTEX_INITIALIZER;
int pthread_mutex_init(pthread_mutex_t *mutex,
const pthread_mutexattr_t *attr);
int pthread_mutex_destroy(pthread_mutex_t *mutex);
int pthread_mutex_lock(pthread_mutex_t *mutex);
int pthread_mutex_trylock(pthread_mutex_t *mutex);
int pthread_mutex_unlock(pthread_mutex_t *mutex);
1
2
3
4
5
6
7
8
9
10
11
12
13
14
15
16
17
18
19
20
21
TestObj *obj = [[TestObj alloc] init];
// 创建锁对象
__block pthread_mutex_t mutex;
pthread_mutex_init(&mutex, NULL);
// 线程1
dispatch_async(dispatch_get_global_queue(DISPATCH_QUEUE_PRIORITY_DEFAULT, 0), ^{
pthread_mutex_lock(&mutex);
[obj method1];
sleep(5);
pthread_mutex_unlock(&mutex);
});
// 线程2
dispatch_async(dispatch_get_global_queue(DISPATCH_QUEUE_PRIORITY_DEFAULT, 0), ^{
pthread_mutex_lock(&mutex);
[obj method2];
sleep(5);
pthread_mutex_unlock(&mutex);
});

Using the NSLock Class

所有锁实际都是实现了 NSLocking 协议,定义了 lock 和 unlock 方法。
NSLock 类使用的是 POSIX 来实现它的锁操作,需要注意的是必须在同一线程内发送 unlock 消息,否则会发生不确定的情况。NSLock 不能用来实现迭代锁,因为如果发生两次 lock 消息的话,整个线程会被永久锁住。

1
2
3
4
5
6
7
8
9
10
11
12
13
14
15
16
17
18
19
20
21
22
23
TestObj *obj = [[TestObj alloc] init];
NSLock *lock = [[NSLock alloc] init];
// 线程1
dispatch_async(dispatch_get_global_queue(DISPATCH_QUEUE_PRIORITY_DEFAULT, 0), ^{
[lock lock];
NSLog(@"线程1 lock");
[obj method1];
sleep(2);
[lock unlock];
NSLog(@"线程1 unLock");
});
// 线程2
dispatch_async(dispatch_get_global_queue(DISPATCH_QUEUE_PRIORITY_DEFAULT, 0), ^{
// 先 sleep 以保证线程2的代码后执行
sleep(1);
[lock lock];
NSLog(@"线程2 lock");
[obj method2];
[lock unlock];
NSLog(@"线程2 unLock");
});

Using the @synchronized Directive

作为一种预防措施,@synchronized块隐式的添加一个异常处理例程来保护代码。该处理例程会在异常抛出的时候自动的释放互斥锁。这意味着为了使用@synchronized指令,你必须在你的代码中启用异常处理。如果你不想让隐式的异常处理例程带来额外的开销,你应该考虑使用锁的类。

1
2
3
4
5
6
7
8
9
10
11
12
13
14
15
16
17
TestObj *obj = [[TestObj alloc] init];
// 线程1
dispatch_async(dispatch_get_global_queue(DISPATCH_QUEUE_PRIORITY_DEFAULT, 0), ^{
@synchronized (obj) {
[obj method1];
sleep(10);
}
});
// 线程2
dispatch_async(dispatch_get_global_queue(DISPATCH_QUEUE_PRIORITY_DEFAULT, 0), ^{
sleep(1);
@synchronized (obj) {
[obj method2];
}
});

Using an NSRecursiveLock Object

首先来看一个🌰:

1
2
3
4
5
6
7
8
9
10
11
12
13
14
15
16
17
18
19
20
21
22
23
24
25
26
27
28
//主线程中
NSLock *theLock = [[NSLock alloc] init];
TestObj *obj = [[TestObj alloc] init];
//线程1
dispatch_async(dispatch_get_global_queue(DISPATCH_QUEUE_PRIORITY_DEFAULT, 0), ^{
static void(^TestMethod)(int);
TestMethod = ^(int value)
{
[theLock lock];
if (value > 0)
{
[obj method1];
sleep(5);
TestMethod(value-1);
}
[theLock unlock];
};
TestMethod(5);
});
//线程2
dispatch_async(dispatch_get_global_queue(DISPATCH_QUEUE_PRIORITY_DEFAULT, 0), ^{
sleep(1);
[theLock lock];
[obj method2];
[theLock unlock];
});

运行这段代码,会发现报错,发生死锁:

2017-05-31 11:54:01.467100+0800 LearnLockIniOSMultiThreading[1863:602383] method1
2017-05-31 11:54:06.471439+0800 LearnLockIniOSMultiThreading[1863:602383] *** -[NSLock lock]: deadlock (<NSLock: 0x6180000c1340> '(null)')
2017-05-31 11:54:06.471478+0800 LearnLockIniOSMultiThreading[1863:602383] *** Break on _NSLockError() to debug.

这里就是之前说的,NSLock 不能用来实现迭代锁,因为如果发生两次 lock 消息的话,整个线程会被永久锁住。这时就应该使用 NSRecursiveLock。

NSRecursiveLock类定义了可以被同一线程获取多次而不会造成死锁的锁。NSRecursiveLock可以被用在递归调用中,一个递归锁会跟踪它被多少次成功获得了。每次成功的获得该锁都必须平衡调用锁住和解锁的操作。只有所有的锁住和解锁操作都平衡的时候,锁才真正被释放给其他线程获得。这种类型的锁通常被用在一个递归函数里面来防止递归造成阻塞线程,只有当多次获取的锁全部释放时,NSRecursiveLock才能被其他线程获取。

1
2
3
4
5
6
7
8
9
10
11
12
13
14
15
16
17
18
19
20
21
22
23
24
25
26
27
28
//主线程中
NSRecursiveLock *theLock = [[NSRecursiveLock alloc] init];
TestObj *obj = [[TestObj alloc] init];
//线程1
dispatch_async(dispatch_get_global_queue(DISPATCH_QUEUE_PRIORITY_DEFAULT, 0), ^{
static void(^TestMethod)(int);
TestMethod = ^(int value)
{
[theLock lock];
if (value > 0)
{
[obj method1];
sleep(5);
TestMethod(value-1);
}
[theLock unlock];
};
TestMethod(5);
});
//线程2
dispatch_async(dispatch_get_global_queue(DISPATCH_QUEUE_PRIORITY_DEFAULT, 0), ^{
sleep(1);
[theLock lock];
[obj method2];
[theLock unlock];
});

因为一个递归锁不会被释放直到所有锁的调用平衡使用了解锁操作,所以你必须仔细权衡是否决定使用锁对性能的潜在影响。长时间持有一个锁将会导致其他线程阻塞直到递归完成。如果你可以重写你的代码来消除递归或消除使用一个递归锁,你可能会获得更好的性能。

Using an NSConditionLock Object

NSConditionLock定义了一个条件互斥锁,也就是当条件成立时就会获取到锁,反之就会释放锁。它的行为和Codition有点类似,但是它们的实现非常不同。因为这个特性,条件锁可以被用在有特定顺序的处理流程中,当多线程需要以特定的顺序来执行任务的时候,你可以使用一个NSConditionLock对象,比如生产者-消费者问题。

NSConditionLock的锁住和解锁方法可以任意组合使用。比如,你可以使用unlockWithCondition:和lock消息,或使用lockWhenCondition:和unlock消息。当然,后面的组合可以解锁一个锁但是可能没有释放任何等待某特定条件值的线程。

1
2
3
4
5
6
7
8
9
10
11
12
13
14
15
16
17
18
NSConditionLock *lock = [[NSConditionLock alloc] init];
// 线程1
dispatch_async(dispatch_get_global_queue(DISPATCH_QUEUE_PRIORITY_DEFAULT, 0), ^{
for (int i = 0; i <= 2; i++) {
[lock lock];
NSLog(@"thread1:%d", i);
sleep(2);
[lock unlockWithCondition:i];
}
});
// 线程2
dispatch_async(dispatch_get_global_queue(DISPATCH_QUEUE_PRIORITY_DEFAULT, 0), ^{
[lock lockWhenCondition:2];
NSLog(@"thread2");
[lock unlock];
});

Using an NSDistributedLock Object

NSDistributedLock是跨进程的分布式锁,锁本身是一个高效的互斥锁,底层是用文件系统实现的互斥锁。如果Path不存在,那么在tryLock返回YES时,会自动创建path。在结束的时候Path会被清除,所以在选择path的时候,应该选择一个不存在的路径,以防止误操作。

NSDistributedLock没有实现NSLocking协议,所以没有会阻塞线程的lock方法,取而代之的是非阻塞的tryLock方法。NSDistributedLock类可以被多台主机上的多个应用程序使用来限制对某些共享资源的访问。对于一个可用的NSDistributedLock对象,锁必须由所有使用它的程序写入。

NSDistributedLock只有在锁持有者显式地释放后才会被释放,也就是说当持有锁的应用崩溃后,其他应用就不能访问受保护的共享资源了。在这种情况下,你可以使用breadLock方法来打破现存的锁以便你可以获取它。但是通常应该避免打破锁,除非你确定拥有进程已经死亡并不可能再释放该锁。和其他类型的锁一样,当你使用NSDistributedLock对象时,你可以通过调用unlock方法来释放它。

1
2
3
4
5
6
7
8
9
10
11
appA的代码:
dispatch_async(dispatch_get_global_queue(DISPATCH_QUEUE_PRIORITY_DEFAULT, 0), ^{
NSString *desktopPath = NSSearchPathForDirectoriesInDomains(NSDesktopDirectory, NSUserDomainMask, YES).firstObject;
NSDistributedLock *lock = [[NSDistributedLock alloc] initWithPath:[desktopPath stringByAppendingPathComponent:@"testDistributedLock__"]];
[lock breakLock];
[lock tryLock];
sleep(10);
[lock unlock];
NSLog(@"appA OK");
});
1
2
3
4
5
6
7
8
9
10
11
12
13
appB的代码:
dispatch_async(dispatch_get_global_queue(DISPATCH_QUEUE_PRIORITY_DEFAULT, 0), ^{
NSString *desktopPath = NSSearchPathForDirectoriesInDomains(NSDesktopDirectory, NSUserDomainMask, YES).firstObject;
NSDistributedLock *lock = [[NSDistributedLock alloc] initWithPath:[desktopPath stringByAppendingPathComponent:@"testDistributedLock__"]];
while (![lock tryLock]) {
NSLog(@"appB waiting");
sleep(1);
}
[lock unlock];
NSLog(@"appB OK");
});

输出如图:DistributedLock

Using the NSCondition Class

NSCondition 是互斥锁和条件锁的结合体,也就是一个线程在等待信号而阻塞时,可以被另外一个线程唤醒。需要注意的是,由于操作系统实现的差异,即使在代码中没有发送signal消息,线程也有可能被唤醒,所以需要增加谓词变量来保证程序的正确性。

  • wait:释放互斥量,使当前线程等待,切换到其它线程执行。
  • waitUntilDate:释放互斥量,使当前线程等待到某一个时间,切换到其它线程执行。
  • signal:唤醒一个其它等待该条件变量的线程
  • broadcast:唤醒所有其它等待该条件变量的线程
1
2
3
4
5
6
7
8
9
10
11
12
13
14
15
16
17
18
19
20
21
22
23
24
25
26
27
28
29
NSCondition *condition = [[NSCondition alloc] init];
NSMutableArray *products = [[NSMutableArray alloc] init];
// 线程1
dispatch_async(dispatch_get_global_queue(DISPATCH_QUEUE_PRIORITY_DEFAULT, 0), ^{
NSLog(@"线程1:before lock");
[condition lock];
NSLog(@"线程1:after lock");
while ([products count] == 0) {
NSLog(@"线程1:wait");
[condition wait];
}
[products removeAllObjects];
NSLog(@"线程1:remove");
[condition unlock];
});
// 线程2
dispatch_async(dispatch_get_global_queue(DISPATCH_QUEUE_PRIORITY_DEFAULT, 0), ^{
sleep(1);
NSLog(@"线程2: before lock");
[condition lock];
NSLog(@"线程2: after lock");
[products addObject:[NSObject new]];
[condition signal];
NSLog(@"线程2 signal");
[condition unlock];
});

Using POSIX Conditions

POSIX 线程条件锁需要条件锁和互斥锁配合。

1
2
3
4
5
6
7
8
9
10
11
12
13
14
15
16
17
18
19
20
21
22
23
24
25
26
27
28
29
30
31
32
33
34
35
36
37
__block pthread_cond_t condition;
pthread_cond_init(&condition, NULL);
__block pthread_mutex_t mutex;
pthread_mutex_init(&mutex, NULL);
__block Boolean ready_to_go = false;
// 线程1
dispatch_async(dispatch_get_global_queue(DISPATCH_QUEUE_PRIORITY_DEFAULT, 0), ^{
NSLog(@"线程1:before lock");
pthread_mutex_lock(&mutex);
NSLog(@"线程1:after lock");
while (ready_to_go == false) {
NSLog(@"线程1:wait");
pthread_cond_wait(&condition, &mutex);
}
// Do work. (The mutex should stay locked.)
// Reset the predicate and release the mutex.
ready_to_go = false;
NSLog(@"线程1:reset predicate");
pthread_mutex_unlock(&mutex);
});
// 线程2
dispatch_async(dispatch_get_global_queue(DISPATCH_QUEUE_PRIORITY_DEFAULT, 0), ^{
sleep(1);
NSLog(@"线程2: before lock");
pthread_mutex_lock(&mutex);
NSLog(@"线程2: after lock");
ready_to_go = true;
pthread_cond_signal(&condition);
NSLog(@"线程2 signal the other thread to begin work");
pthread_mutex_unlock(&mutex);
});

Using GCD dispatch_sempaphore

dispatch_sempaphore 是 GCD 用来同步的一种方式,它主要有两个应用: 保持线程同步 和 为线程加锁。提供以下方法:(参考)

  • dispatch_semaphore_t dispatch_semaphore_create(long value):方法接收一个long类型的参数, 返回一个dispatch_semaphore_t类型的信号量,值为传入的参数
  • long dispatch_semaphore_wait(dispatch_semaphore_t dsema, dispatch_time_t timeout):接收一个信号和时间值,若信号的信号量为0,则会阻塞当前线程,直到信号量大于0或者经过输入的时间值;若信号量大于0,则会使信号量减1并返回,程序继续住下执行
  • long dispatch_semaphore_signal(dispatch_semaphore_t dsema):使信号量加1并返回

保持线程同步

1
2
3
4
5
6
7
8
9
10
11
dispatch_queue_t queue = dispatch_get_global_queue(0, 0);
dispatch_semaphore_t semaphore = dispatch_semaphore_create(0);
__block int j = 0;
dispatch_async(queue, ^{
j = 100;
dispatch_semaphore_signal(semaphore);
});
dispatch_semaphore_wait(semaphore, DISPATCH_TIME_FOREVER);
NSLog(@"finish j = %zd", j);

运行代码,输出 j=100。 如果注释掉 wait 这句,则输出 j=0。
原因:block 是异步添加到并行队列 queue 里,所以主线程是越过 block 直接到 dispatch_semaphore_wait 这一行,此时,semaphore 信号量为0,时间值为 Forever,所以一定会阻塞主线程,block到异步并行队列执行,发送signal,使信号量+1,此时主线程继续执行,起到了同步的效果。

为线程加锁

当 semaphore 信号量为1时,可以用于加锁。

1
2
3
4
5
6
7
8
9
10
11
12
13
14
15
16
17
18
TestObj *obj = [[TestObj alloc] init];
dispatch_semaphore_t semaphore = dispatch_semaphore_create(1);
// 线程1
dispatch_async(dispatch_get_global_queue(DISPATCH_QUEUE_PRIORITY_DEFAULT, 0), ^{
dispatch_semaphore_wait(semaphore, DISPATCH_TIME_FOREVER);
[obj method1];
sleep(10);
dispatch_semaphore_signal(semaphore);
});
//线程2
dispatch_async(dispatch_get_global_queue(DISPATCH_QUEUE_PRIORITY_DEFAULT, 0), ^{
sleep(1);
dispatch_semaphore_wait(semaphore, DISPATCH_TIME_FOREVER);
[obj method2];
dispatch_semaphore_signal(semaphore);
});

Using OSSpinLock

先声明一下,OSSpinLock 在iOS10 和 macOS 10.12已经被废弃, 苹果给出了替代方案 os_unfair_lock。参考

现在来学习一下OSSpinLock,主要提供以下方法:

  • typedef int32_t OSSpinLock;
  • bool OSSpinLockTry( volatile OSSpinLock *__lock );
  • void OSSpinLockLock( volatile OSSpinLock *__lock );
  • void OSSpinLockUnlock( volatile OSSpinLock *__lock );

OSSpinLock是一种自旋锁,和 NSLock 不同的是 NSLock 请求加锁失败的话,会先轮询,但一秒过后便会使线程进入 waiting 状态,等待唤醒。而 OSSpinLock 会一直轮询,等待时会消耗大量 CPU 资源,不适用于较长时间的任务。

New To iOS

发表于 2017-05-25 |

从萌生想法,到鼓起勇气面试,蹉跎半年终于成行。
走出舒适区,拥抱变化,为新的挑战做准备, 愿一切都好~

Introduce?

今天终于确定了可以转作iOS,没有预想的那么开心,有些压力。自己去年的考核还是棒棒哒,不知道转BG后,上半年的考核会变成啥样,感觉会成背锅侠,呜呜,人家不想当背锅侠(:/cry)

但是不看money(不看money,看啥(:/抠鼻)),看未来的发展,觉得自己是对的,是明智的,坚信不能在该拼搏学习的年纪安逸度日!

今天狠下心注册了苹果的开发者账号,惊奇的发现苹果变善良了,开发者账号居然苹果全平台可用了,瞬间感觉99刀花的值了~ 为了让自己更有动力,和男朋友打了个1000软妹币的赌注,2017年一定要提交一个作品!!!

写了个小程序 Pitch Perfect,第一次用开发者账号在真机运行,记录一下遇到的问题。

Prepare

add device to Apple ID devices

Xcode7 之后真机调试也不用证书了,但是我还是加了下,学习下流程。
itunes 中查看手机的 UDID,然后登陆 Apple 的 Member Center,添加设备的 UDID。

Create Project

process symbol files

创建工程后运行,弹出提示:process symbol files.
google 了下这个阶段,Xcode到底在做什么,以下来自 stack overFlow

It downloads the (debug) symbols from the device, so it becomes possible to debug on devices with that specific iOS version and also to symbolicate crash reports that happened on that iOS version.

Since symbols are CPU specific, the above only works if you have imported the symbols not only for a specific iOS device but also for a specific CPU type. The currently CPU types needed are armv7 (e.g. iPhone 4, iPhone 4s), armv7s (e.g. iPhone 5) and arm64 (e.g. iPhone 5s).

So if you want to symbolicate a crash report that happened on an iPhone 5 with armv7s and only have the symbols for armv7 for that specific iOS version, Xcode won’t be able to (fully) symbolicate the crash report.

after “Processing Symbol Files”, a folder containing symbols associated with the device (including iOS version and CPU type) was created in ~/Library/Developer/Xcode/iOS DeviceSupport/ like this: dirctory to Symbol

couldn’t launch

连接上设备后,应用仍然无法运行,弹出提示:

此时就按提示做,解锁设备,打开 设置->通用->设备管理->开发者应用,然后信任开发者,再验证应用。

NOTE:这里trust操作必须联网才可完成,否则会报错。
关于联网验证问题,查了Apple的官方文档:

You must be connected to the Internet to verify the app developer’s certificate when establishing trust.
If you’re behind a firewall, make sure that it’s configured to allow connections to https://ppq.apple.com.
If you aren’t connected to the Internet when you trust an app, the device displays “Not Verified” instead.
To use the app, connect to the Internet and tap the Verify App button.

关于联网验证 stack overflow 还有一些其他方法绕过,具体不再细究。

OS_Activity_Mode

想要真机运行真是磨难重重,又一拦路虎:
if we’re in the real pre-commit handler we can’t actually add any new fences due to CA restriction.

这个问题就是添加环境变量 OS_Activity_Mode 并置 disable.

RUN

PitchPerfect 应用是录制声音并进行音高速率的变化的小应用,需要访问麦克风。真机跑起来,点击录制,随即 crash,报错:

This app has crashed because it attempted to access privacy-sensitive data without a usage description.
The app’s Info.plist must contain an NSPhotoLibraryUsageDescription key with a string value explaining to the user how the app uses this data.

按照错误指引,在 Info.plist 中添加了Key: NSPhotoLibraryUsageDescription。具体如下:

1
2
3
<!-- 麦克风 -->
<key>NSMicrophoneUsageDescription</key>
<string>App需要您的同意,才能访问麦克风</string>

描述字符串自己随意填写就可以,但是一定要填写,不然会引发包无效的问题,导致上传打包后构建版本一直不显示。

Final

就像开篇写的一样,拥抱变化,迎接挑战,Hack On ~

程序安全开发

发表于 2017-05-23 |

昨天听了「程序安全开发」这门课,对今后项目开发有很大的警示作用,这里先做个脑图整理,之后慢慢补充。

我是脑图

OS X animations

发表于 2017-05-17 |

新项目做一个背景渐变,同时图片缩放的动画,在设计老板的电脑上卡的厉害,所以展开了一系列对动画的研究。

先上脑图:
脑图

从图中可以看出是不推荐使用 NSAnimationContext,它是在主线程不断调用 setFrame: 和 setFrameSize: 等实现的移动和缩放动画,显然效率低下。同时我的图片又是采用离屏渲染的,所以性能更加不好。

经过这几篇文章的学习,最终采用以下步骤优化:

  1. 采用layer-based 的 CoreAnimation。
  2. 优化重绘策略:NSView 的property 设置为 NSViewLayerContentsRedrawOnSetNeedsDisplay
  3. 图片展示不再用 NSImageView, 直接设置为 layer 的 contents。

最终实现效果老板终于满意啦,做的 Demo。

Create Mac memory pressure observer

发表于 2017-05-16 |

Mac的资料真心少,先来看看iOS是怎么做的。

memory pressure observer on iOS

how to observe

  • 可以监听 UIApplicationDidReceiveMemoryWarningNotification 通知。
1
2
3
4
[[NSNotificationCenter defaultCenter] addObserver:self
selector:@selector(XXX)
name:UIApplicationDidReceiveMemoryWarningNotification
object:nil];
  • 实现 UIViewController 自身的方法didReceiveMemoryWarning,该方法在 App 接收到 memory warning 会被调用,可以在方法中释放当前不再使用的资源。
1
- (void)didReceiveMemoryWarning;

how to mock

  • 模拟器菜单
    hardware -> simulate memory warning

  • 模拟发通知 UISimulatedMemoryWarningNotification

1
CFNotificationCenterPostNotification(CFNotificationCenterGetDarwinNotifyCenter(), (CFStringRef)@"UISimulatedMemoryWarningNotification", NULL, NULL, true);
  • 私有 API
1
[[UIApplication sharedApplication] performSelector:@selector(_performMemoryWarning)];

memory pressure observer on Mac

终于要切入正题,按照iOS调研的节奏开始查资料~

how to observe

以下来自 Github

1
2
3
4
5
6
7
8
9
10
11
static dispatch_source_t source = nil;
source = dispatch_source_create(DISPATCH_SOURCE_TYPE_MEMORYPRESSURE, 0, DISPATCH_MEMORYPRESSURE_WARN | DISPATCH_MEMORYPRESSURE_CRITICAL, dispatch_get_main_queue());
dispatch_source_set_event_handler(source, ^{
dispatch_source_memorypressure_flags_t pressureLevel = dispatch_source_get_data(source);
[NSNotificationCenter.defaultCenter postNotificationName:DidReceiveMemoryWarningNotification
object:nil
userInfo:@{ @"pressure": @(pressureLevel) }];
});
dispatch_resume(source);

其中 dispatch_source_create 的解释:

Creates a new dispatch source to monitor low-level system objects and automatically submit a handler block to a dispatch queue in response to events.

可以监控的 system objects 很多,包括 Timer,Signal, MemoryPressure 等。

其中 memoryPressure level 的定义如下:

1
2
3
#define DISPATCH_MEMORYPRESSURE_NORMAL 0x01
#define DISPATCH_MEMORYPRESSURE_WARN 0x02
#define DISPATCH_MEMORYPRESSURE_CRITICAL 0x04

how to mock

目前找到的方法,
在 terminal 输入:

1
sudo memory_pressure -S -l critical -s 15

-S causes the system to simulate the specified memory pressure (warn | critical), and -s tells how many seconds to hold that simulated pressure.

配置.gitignore

发表于 2017-04-18 |

GitHub 官方

GitHub 官方已经准备了适用各种语言和开发环境的配置文件,链接。选择下载对应的语言,再结合自定义就可以配置好用的 .ignore 啦。

忽略文件的原则

  • 忽略操作系统自动生成的文件,比如缩略图等;
  • 忽略编译生成的中间文件、可执行文件等,也就是如果一个文件是通过另一个文件自动生成的,那自动生成的文件就没必要放进版本库;
  • 忽略你自己的带有敏感信息的配置文件,比如存放口令的配置文件。

.gitignore 文件规范

  1. 所有空行或者以注释符号 # 开头的行都会被 Git 忽略。
  2. 可以使用标准的 glob 模式匹配。
  3. 匹配模式最后跟反斜杠(/)说明要忽略的是目录。
  4. 要忽略指定模式以外的文件或目录,可以在模式前加上惊叹号(!)取反。

glob 模式

  1. *:任意个任意字符。
  2. []:匹配任何一个在方括号中的字符。
  3. ?:匹配一个任意字符。
  4. [0-9]:匹配字符范围内所有字符。

配置 .gitignore

可以在对应的Git目录下,创建.gitignore文件。在忽略项中加入.DS_Store。

  • 创建 .gitignore 文件
1
$ touch .gitignore
  • 编辑 .gitignore 文件
1
2
$ .DS_Store
$ */.DS_Store

保存即可生效,目前已完成忽略了当前目录的 .DS_Store 以及其子目录的 .DS_Store。但是怎样才能达到全局有效呢,这里就需要全局配置,让忽略文件对多有Git目录都生效,这里就需要用到git config。

配置 Git Config

Git Config实际上是一个文件,位于用户根目录,名称是 .gitconfig。

1
2
3
4
$ touch .gitignore_global
// 编辑 .gitignore_global 文件,添加以下代码,引入.gitignore_global文件
[core]
excludesfile = /Users/reon/.gitignore_global

把从 GitHub 上下载的自定义修改后的 .gitignore 文件 copy 到该路径即可。

添加 .gitignore 后不生效怎么办

  • you must pay attention to the global gitignore file which sometimes may influence your gitignore.
  • When you add something into .gitignore file。First commit your current changes, or you will lose them.
1
2
3
$ git rm -r --cached .
$ git add .
$ git commit -m "fixed untracked files"
  • When you remove something from .gitignore file.The above steps will not work for you. First commit your current changes, or you will lose them.
1
2
3
4
git add -f "filetype"
git commit -m "Refresh removing filetype from .gitignore file."
// the "filetype" means the file or filetype you want to remove from the .gitignore file.
// You want to make the filetype be tracked again.
12
melody5417

melody5417

15 日志
23 标签
© 2018 melody5417
由 Hexo 强力驱动
主题 - NexT.Pisces